VENUZI Croissant Recipe
How many: 12 croissants (Approx)
Time: 2 days! Day 1, Start in the morning and ensure you are home all day.

The End Result
THE DOUGH
500g Strong Flour
1 ½ tbs Yeast
50g Butter
250ml Milk
250ml Water
1 ½ tsp Salt
BUTTER SQUARE
300g Unsalted Butter
EGG WASH (mix on Method Day 2)
1 Egg
1 tbs water
½ tsp salt
ADDITIONAL ITEMS
Baking paper & cling wrap
Oil spray or oil on a paper towel
Medium size Bowl, rolling pin, baking tray, cooling rack, pastry brush
METHOD DAY 1
CROISSANT DOUGH
Start with the dough, mix with your hands, flour, salt, sugar, 50g butter, until fully combined to a fine crumb
Heat milk and water to 20 degrees, stir yeast through (don’t overheat the liquid before adding the yeast or it will die. Just heat for half a minute on the stove) leave to sit for a minute, so the yeast can activate and starts to bubble
Mix yeast liquid with the above dough mixture, until combined
Knead on a VERY lightly floured surface for 10 minutes; really put your back into it. This is a great moment to have time to yourself, think about great things or just start singing like nobody is watching, “You can do it, put your back into it!!”
Place dough into a lightly oiled medium sized bowl, cover with cling wrap, refrigerate for 2 hours. Bowl large enough for the dough to rise double in size and it must fit in the fridge
BUTTER SQUARE
Cut unsalted butter into two rectangles
Place butter between two sheets of baking paper and roll into a square
TIP: If the butter is too cold, give it a good beat with the rolling pin. A great option if you are frustrated today
TIP: If the butter is too hot and starts to melt, put it in the fridge for a few minutes
Roll it into a perfect square about, 25cm by 25cm, 3mm thin. Having trouble getting it into a square shape? Cut the wonky sides, place the cut pieces into the middle of the butter square and roll again, until you reach the desired square shape
Place the butter square into the fridge, keeping it in the baking paper. Allow to cool and harden 1 hour is ideal
COMBINING THE DOUGH WITH THE BUTTER SQUARE:
Remove the dough from the fridge, it should have risen
Roll the dough into a large rectangle, large enough so the butter square fits into the middle and the sides can be folded over, to create an envelope shape
Do the above envelope with your butter square
Slowly roll your envelope into a another rectangle about 60cm, and 4cm in width you don’t want the butter escaping from the envelope, just enough so you can fold it into a neat little parcel
Making the parcel, fold one side into the middle, keeping about 20 cm flat on the bench, then fold the other side over the fold, to create the parcel
Wrap in cling wrap and refrigerate your parcel for ½-1 hour. Every time you have placed it in the fridge, the parcel will swell and rise a little bit
Continue the above last two steps 2-3 more times. If the butter is hard, tap it with the rolling pin first, so the sides don’t split with the hard butter. Try to keep the butter contained in the dough. The more you roll and fold the more layers for croissant players J
TIP: If the dough becomes buttery, lightly flour the buttery area, emphasis on lightly!
Refrigerate for 12-24 hours
METHOD DAY 2
YOU CAN EAT THE DELICIOUS CROISSANT TODAY! But before you do……

Line a baking tray with baking paper, so it is flat on the tray and not crinkled on the sides
Remove dough parcel from fridge
Between two large pieces of baking paper and use the rolling pin make a large rectangle. If it’s a hot day, I would recommend chopping it in half and doing it in two pieces
Cut off the sides so the rectangle has perfect straight sides. Keep access and let rise into mini croissants or scrolls, this labour of love shouldn’t be wasted!
Once the rectangle is about 2mm thin, measure the top of the rectangle and bottom, and make a knife imprint every 6-7cm
Using a sharp knife cut diagonally, starting from left to right, to create long triangle shapes
Stack the cut triangles to one side, so they stay cool together and don’t melt
Cut a 1cm slice on the bottom of the triangle, so there is a cut in the middle
ROLLING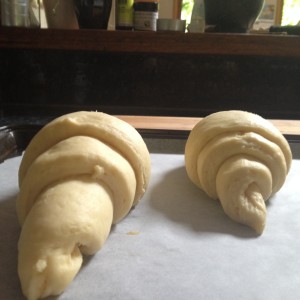
Hold the bottom corners and roll outwards and then press the last bit of the rolled triangle onto itself, to create a mini croissant shape!?
Place on lined baking tray
Do this for the remainder of the triangles
Mix egg wash
Using the pastry brush, lightly brush the croissant with the egg wash
Place some small glasses e.g. shot glasses or ramekins in the corners of the baking tray, be sure to leave a gap between the croissant, and the glasses so the croissant has room to rise
Let the rolled/shaped croissants rise for 2 hours! In a warm room, away from direct sunlight
After 2 hours, you should have noticed the croissants rise double in volume…
Preheat oven to 220 degrees
Remove cling wrap and brush with egg wash again
Bake for 15 minutes
Let the baked croissant cool slightly before eating
EAT YOUR LABOUR OF LOVE -WAHOO!
Let me know, was it worth it?
Did you discover anything that could help others?
Also related to this recipe, see TIPS-Making Croissants